
Guest BLOG - Neapolitan Pizza Conquered
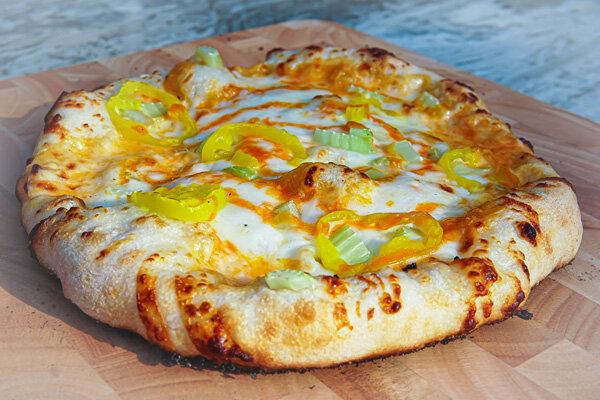
Neapolitan pizza is the pizza that folks aspire to. It is the ultimate challenge of proper dough recipe, technique, oven temperature, dough handling, and cooking technique. It is not for the faint of heart they say. When it is done right, the pizza is light, almost fluffy, yet it has a certain toughness to it. In my previous blog I stressed the need to match the recipe to the temperature HERE. This recipe is definitely for a hot oven.
I have invited our customers, Jason and Cassie Hulme, to share their experience in taking on this challenge. Here is how they conquered Neapolitan pizza in his Big Green Egg.
Thank you, Cortlandt for having us blog! The Pizza-Porta has been an absolute game changer and we will never go back. I think we had tried every possible pizza recipe and technique for pizza on the Big Green Egg in our 7 years with our kamado-style grill but there was always a trade off that wasn’t acceptable. The Neapolitan pizza is the ultimate party experience for hosting friends, kids, and loved ones. To be able to make that at home is an experience that is hard to put into words. Especially when you can cook two at a time with the Pizza-Porta and it only takes between two minutes and three and a half minutes per pizza.
We’ve tried a lot of recipe’s with a lot of mixed results. I’ll turn this section over to Cassie as it’s her expertise. (Cassie take over about recipe)

Recipe
Cassie:
Keep in mind that I’m not a pro, and the Neapolitan gods might be smiting me for what I’m doing to this dough. However, I feel good about where I am with this recipe with trial and error failures and some delicious successes.
2-3ish Days before Pizza - Make your POOLISH
I had never heard of poolish before making this dough. Think of it as a starter with a head-start as you’ll be adding yeast here. When the poolish is ready it’ll be super bubbly, doubled in size and the consistency of sticky, sticky slime.
POOLISH INGREDIENTS
.12g active dry yeast
47g cold water
47g 00 flour
Whisk yeast and cold water together for ~30 seconds. Add flour and stir with a rubber spatula until well combined. Scrape down the slides of your bowl, cover and let sit at room temperature for 18 hours.

Poolish
1-2ish days before before pizza
Make sure your poolish is bubbly and has doubled in size. You should be playing with adult-slime at this point.
DOUGH INGREDIENTS2.3g active dry yeast
70g warm water
453 grams 00 flour
210 grams ice water
90 grams poolish (recipe above makes 90g poolish)
10g fine sea salt
Add yeast to a bowl with warm water and whisk until well combined.
Measure flour into a stand mixer fitted with a dough hook and slowly incorporate the ice water followed by the yeast water mixture and continue mixing for 30 seconds.
Add your poolish mixture and mix on low for 1 minute.
Scrape the sides and bottom of your bowl, pull the dough away from the dough hook then add in your salt.
Continue to mix on low for 1 minute. Your dough should be in a ball at this point. Remove the dough from the bowl and hand knead for 3 minutes on an un-floured surface. If it’s too sticky, it’s ok to sprinkle on a little flour so you can work with it… just be careful not to go overboard.
Cover the dough and let sit for 2-3 hours. I’ve used a damp towel here and that works totally fine. I prefer to put it in a plastic tub with a lid. The point is you do not want the dough to dry and create ‘skin’.

Risen Dough
After I’ve let this sit for a few hours, divide the dough and form into balls. I can usually get ~3 good sized personal pizzas with this recipe. In order to not waste a bit of dough I tare my mixing bowl to my scale, then weigh the dough in the mixing bowl and divide by 3 to know the perfect weight I’m looking to get from a dough ball.
Place the dough ball on a floured flat baking sheet and cover with plastic. Again, the goal here is not to let the dough dry out and create a skin.

Dough Balls
Refrigerate for at least 24 hours, but plan to cook by 48 hours.
Dough Handling
A few hours before you’re ready to cook, pull out your dough balls and let it come to room temp. It’ll be much easier to work with. This dough feels so silky in your hands. I love working with it. It is really hard to describe in words how to shape a pizza. Start by taking a ball and gently pat/drop back and forth between your hands until it starts flattening into a disc. I will start working the dough on top of my fists, then once it’s a bit wider switch to a method that looks and feels a bit like driving a steering wheel. The goal is really to work the dough from the center out. You should be able to see light through the dough without any holes.
Flour / cornmeal your pizza peel so your dough will slide really well off the peel onto your pizza stone. We’ve used a pizza screen, but it’s really hard to get the right amount of crunch without burning the rest of the pizza.
Sauce and top to your heart’s content and cook!
Pizza cook:
Pizza-Porta 2.0 with Double Rack
Finally a section Jason can help with! The first step is fill the grill up with lump all the way to the top of the ring. Then the most important part of the setup for me is starting with lighting the fire and putting a small electric fan (the one I got was off amazon that appears to be used for manicure nail drying) for around $15. This gives exponentially more air intake which speeds up getting the grill to temp. Remember we are aiming for 815-850 so the sooner the better.
Once the lump is lit and the the fan is going the setup looks like: Bottom and top vents on the big green egg all the way open. The Pizza-Porta vents and door are completely closed. Once the dome temp hits just over 500 flip the vent setup. So close the top vent and now open the vents on the Pizza-Porta but keep the bottom big green egg vent wide open. In about 10 minutes your bottom pizza stone will be at 820-850 degrees and the top stone 790-800.
Getting the pizza off the peel is very important, technique wise. You need good flour on the peel and to be very quick. After 45 seconds rotate the pizza with your metal peel as the dough has already locked in its initial structure. Depending on the diameter of the pie it will take between two minutes and three minutes thirty seconds. Once the pie is 80% through its time window I like to move it to the top stone to brown up the toppings a little extra.


I want to thank Jason and Cassie for all the work they have put into pizza experimentation and writing this blog!
If you have a technique that you would like to share, send me an email and I can set it up. For more information about how the recipe works click HERE.
Cortlandt