
Placing the Large Pizza-Porta
Installation
Hinge Adjustment
Handle bulletin
Setup - Large Big Green Egg with Original Pizza-Porta
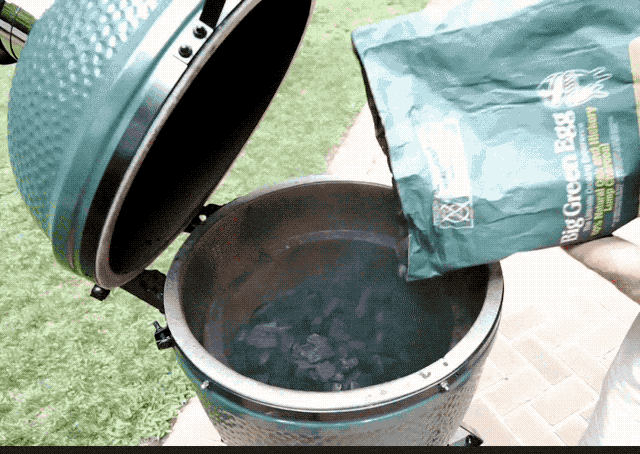
Pour in a full load of charcoal - go ahead and cover that fire ring! A full load of good charcoal will cook for 3.5 - 4 hrs at 600F. The setup inside the egg starts with the platesetter legs down (not in the low position slots), some pipe fitting, flower pots, balled aluminum foil or other non-conducting spacer. Then, an aluminum pizza pan makes a great additional deflector below the pizza stone. The challenge in cooking in a Kamado is that all the heat is below the stone. Deflectors and spacers protect the bottom of the pizza stone and trapping the heat in the dome raises the temperature of the ceramic of the dome. The insertion of the Pizza-Porta is a bit unique in the older BGE hinge. Hold the Pizza-Porta against the top and make sure the acorn nuts are inside of the dome. Then, lower the dome and the Pizza-Porta together. Remember to lift the Pizza-Porta with the dome to remove the unit after cooking.
Grill Setup - Large 2.0 Single Stone
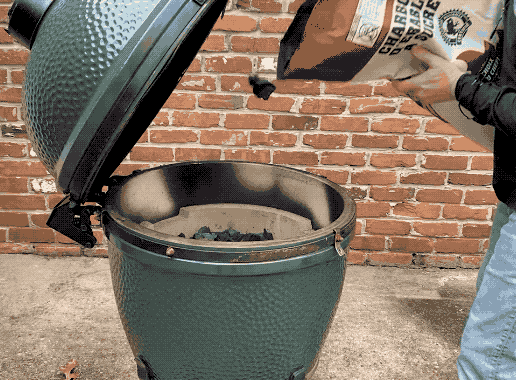
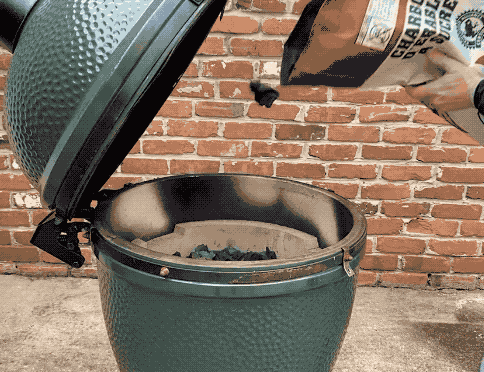
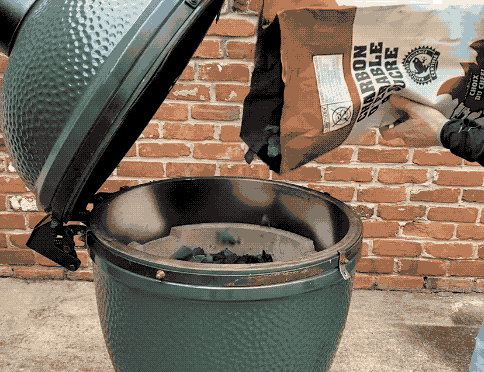
Pour in a full load of charcoal - go ahead and cover that fire ring! A full load of good charcoal will cook for 3.5 - 4 hrs at 600F. The setup inside the egg starts with the platesetter legs down (not in the low position slots). Then, an aluminum plate can be used as an additional deflector below the pizza stone. If you would like additional spacers, position them between the metal cooking grate and the aluminum deflector. The challenge in cooking in a Kamado is that all the heat is below the stone. Deflectors and spacers protect the bottom of the pizza stone and trapping the heat in the dome raises the temperature of the ceramic of the dome. Below is the process:
Grill Setup - Large 2.0 with double racks
There are 2 different double rack options for the Large. the first video is the RCL Double rack which is installed over the plate setter placed legs up (not in the low position slots), with one leg toward the front of the grill as shown. The metal deflector is placed below the lower stone.
The other double rack is the built-in 2.0 rack. The rack is attached to the sides of the Pizza-Porta. It is also placed over the platesetter with the legs positioned up as shown (not in the low position slots). The metal deflector is placed below the lower stone. Do not lift or transport the Pizza-Porta with both stones in place.
Hinge Adjustment
If the dome does not close, or the bands touch the Pizza-Porta, check your BGE hinge alignment. The Pizza-Porta is specifically designed to fit the Big Green Egg at its factory setting. Heating and cooling cycles in the grill can cause it to become misaligned over time. Adjust the bands as shown below. The factory red/blue BGE spacers shown are 10mm/ 3/8" thick. Also, do not forget to tighten the bands from time to time to ensure they remain in alignment.

Click Here for detailed video from BGE for adjusting the hinge. Make sure the bands are aligned the same all the way around. After a few hot cooks, re-tighten the bands. (The flat portion of the little red spacer that sits on the felt is not adjusting the opening, it is simply there to hold the spacer in place while you tighten the bolts)
Here is a diagram of what to look out for if you have a gap in the front, or the Pizza-Porta will not slide all the way back into place. This happens as a result of the band slipping during hot cooks - it is not uncommon. A small misalignment in the back is amplified at the front. The bands can also become misaligned left and right - make sure the distance between the bands is equal all the way around your grill.

Large Big Green Egg - HANDLE BULLETIN:
We have seen some recent variation in the manufacturing of the handle on BGE Large units. This is causing the handle to be misaligned. The handle should extend straight out from the hinge as pictured here. If the handle is angled down, loosen the nuts (circled) and pull the handle up to align it. Re-tightening the nuts while keeping a little upward pressure on the handle.

BGE Large Handle