The ultimate guide to setting up a kamado grill for pizza.
You may have already faced some of the pizza cooking challenges that I did: It was hard to get the pizza onto the hot stone, the pizza stuck to the stone, accidental calzones, the bottom burned before the top was even cooked, burned facial hair, and generally mediocre pizza. I set out to overcome these challenges for myself. I tinkered in my garage and invented the Pizza-Porta (not on the first try). Along the way I have learned a lot of tricks about cooking pizza on a ceramic, kamado style grill. I have included a number of helpful tips below to get you started, but to make authentic, wood-fired pizza consistently in your Kamado grill you need a Pizza-Porta. (click here to see why)
I hope these tips are helpful for you. Please feel free to pass these along to your friends whether they are Kamado Joe Pizza fans, Vision Grill Pizza fans, or Big Green Egg Pizza fans.
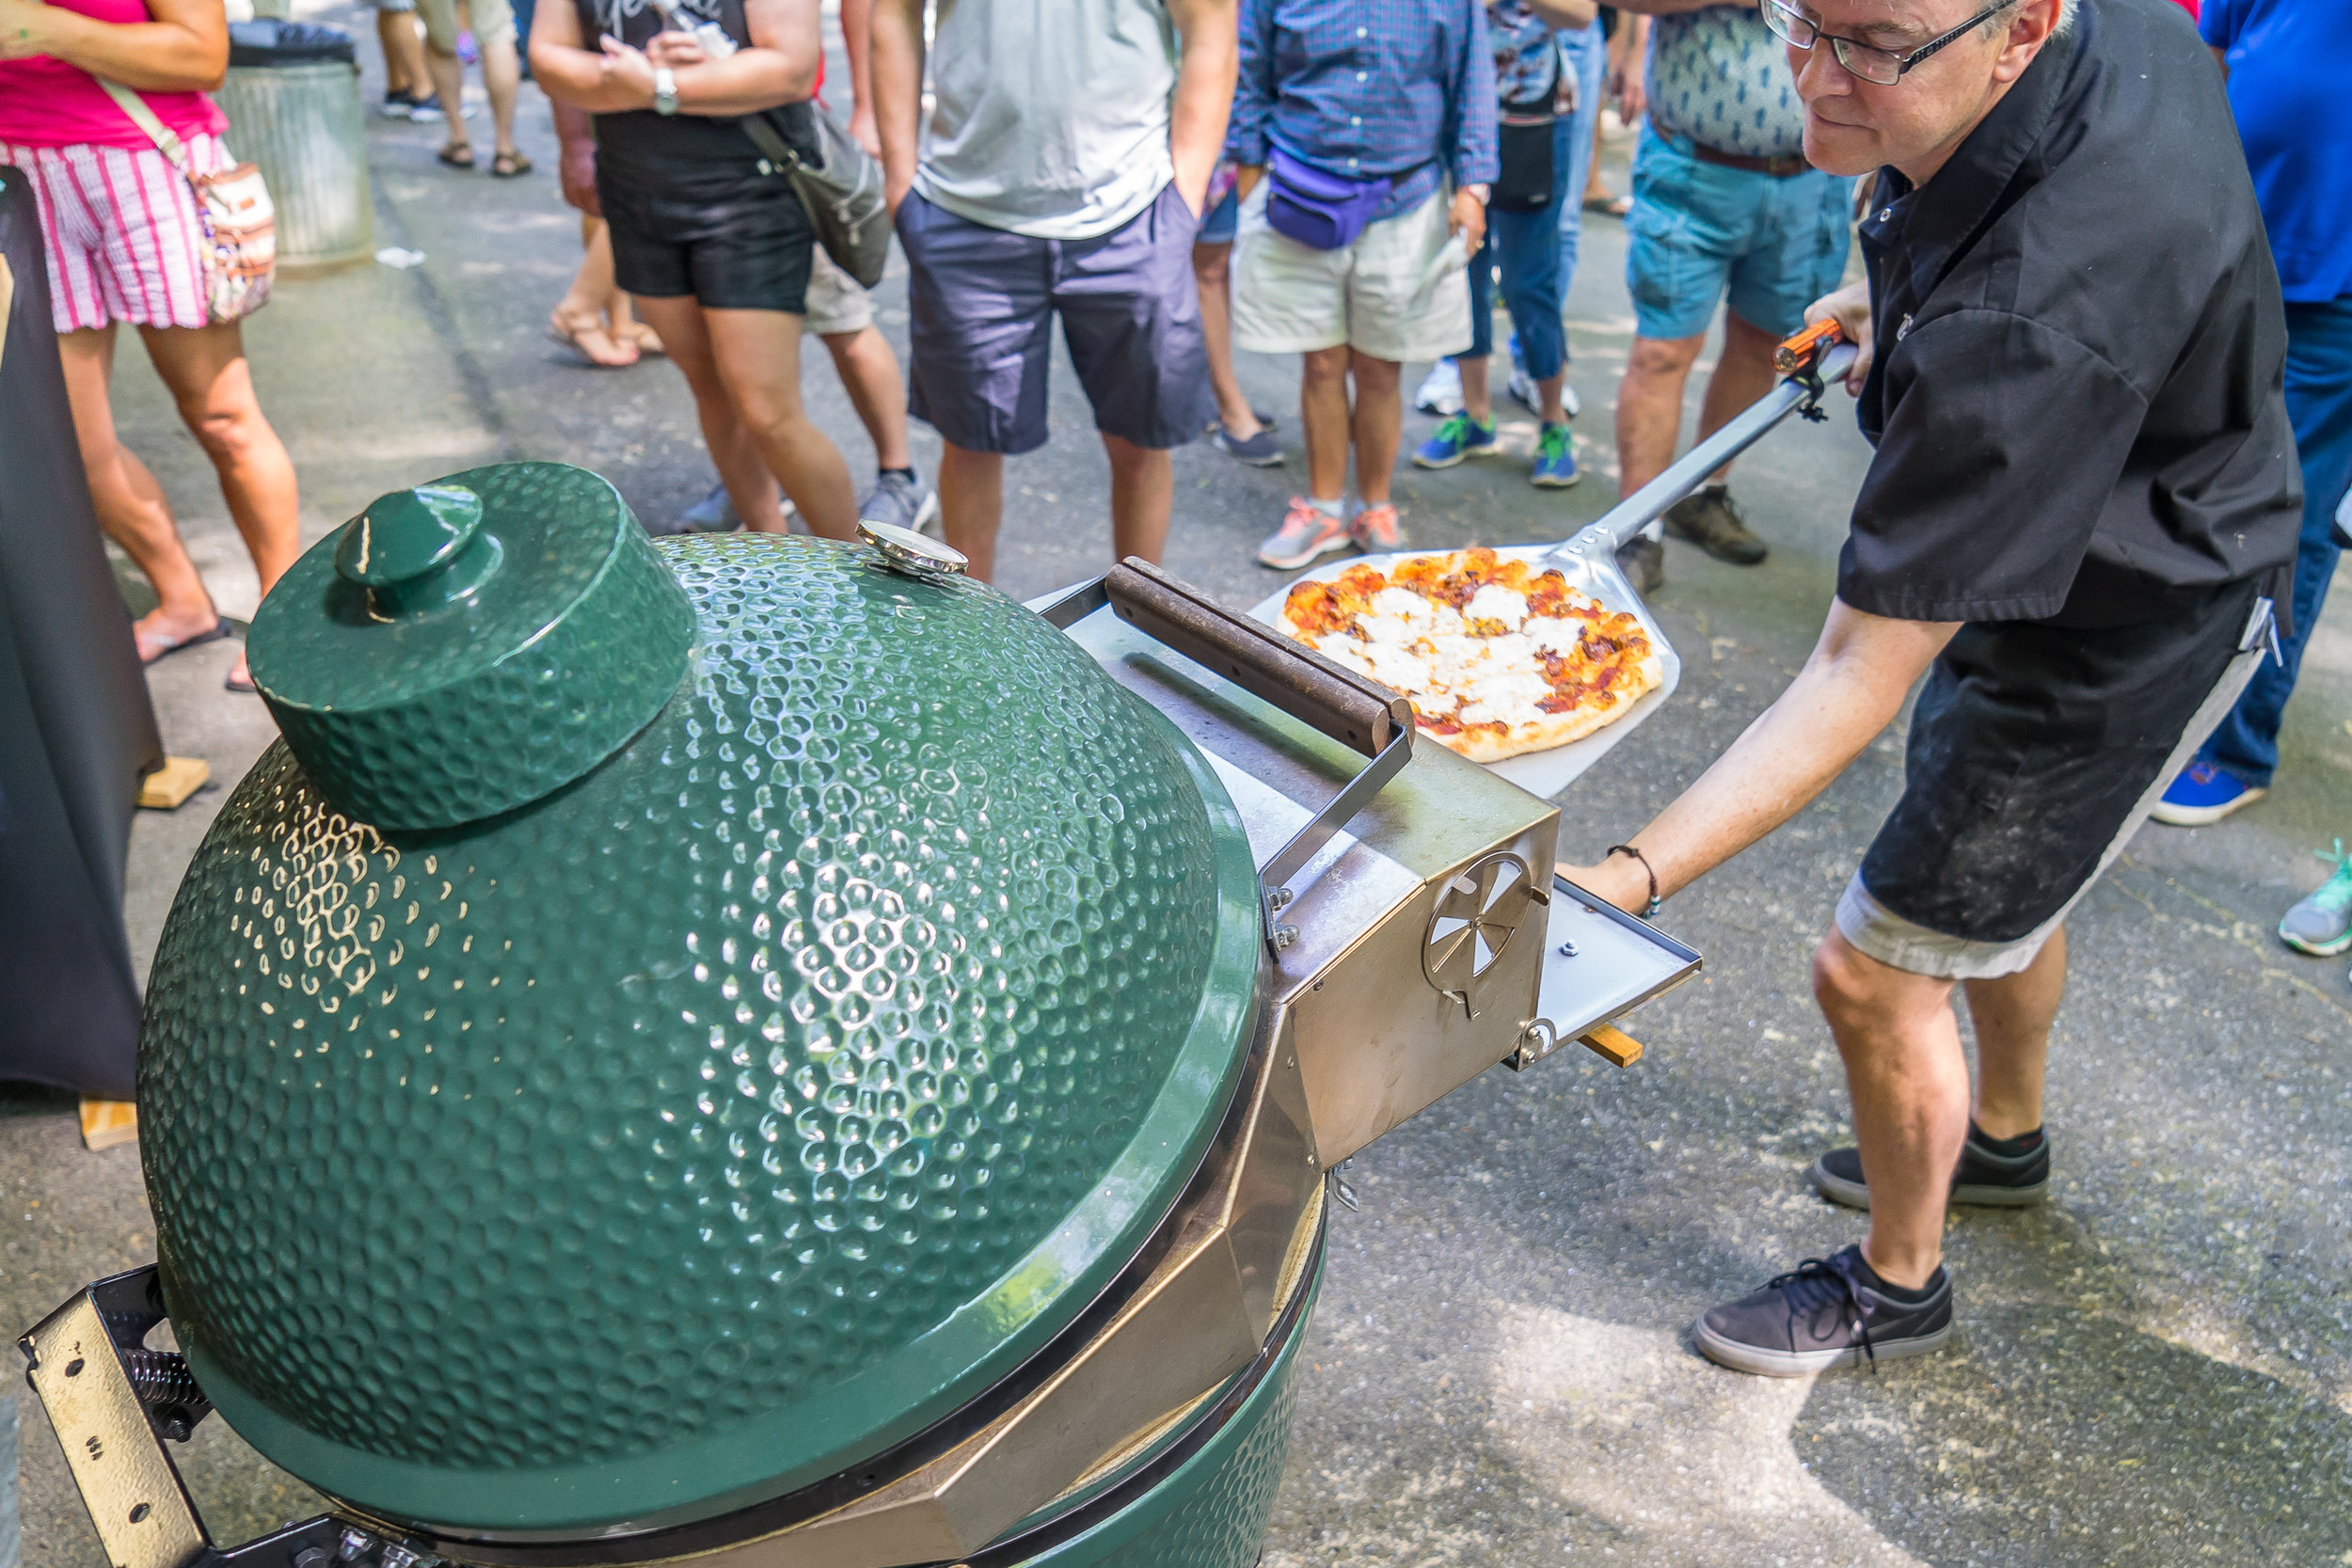
One of the 50 pizzas we cooked at North Ga Eggfest.
Charcoal
Nothing stirs up more discussion than lump brand. I am brand agnostic, but there are a couple of attributes of charcoal that truly interfere with cooking pizza. First - you are cooking at a high temperature so put enough charcoal in to match the consumption. Watch out for brands that create a great deal of flame even after being fully engulfed as they often put off a chemical odor. This odor will be absorbed by the crust. There is a lot of folklore about lump size. Filling the firebox with huge chunks of charcoal results in lower temperatures for various reasons. While It is helpful to place large pieces in the bottom so that you don't choke the airflow, a mix with chicken-egg size lump reaches higher temperatures. Conversely a bag of tiny chips makes a solid mat and chokes your airflow. (See my interview with Jonathan at Rockwood for the detailed story)
Airflow
The intense heat of a kamado grill is the result of its airflow design. Air is sucked in the bottom to replace the air expelled out the top. The hotter it gets, the faster this air is expelled and faster it is drawn into the bottom. If the charcoal or deflectors or stones impede the airflow, it will impede this furnace tendency. Pizza likes to be cooked at temperatures not achievable in a home oven. Use a grate in the bottom (instead of the plate with holes) as it is self-clearing when small chunks of charcoal drop toward the bottom. Make sure that airflow gaps are wide to reach high temperatures. (Chad at Kick Ash Basket had some pointers in our interview)
Deflection
There is a hot fire directly underneath the pizza stone. This is the source of all the heat, and unfortunately for baking, it is all concentrated below the cooking surface. To balance this concentration of energy, the grill must be set up so that the heat is reflected off the bottom of a deflector - not the pizza stone- and passed around the edges to heat the ceramic surfaces on the sides and top of the dome.
The goal for a more Neapolitan style pizza is to have the dome temperature super-hot (>700F) and the stone oven floor nearly the same temperature. This of course is not the natural tendency of a kamado grill. Using a plate setter or deflector stone is the first obvious step, but there are a couple of cautions:
1) When it is placed legs up and set down in the three slots of the fire ring, the platesetter may limit your airflow, keeping the grill from reaching high temperatures.
2) Using the platesetter with legs up and the cooking grate to hold the stone does allow heat to sneak around the plate setter and heat the bottom of the stone.
3) The Kamado Joe deflectors limit the airflow when they are on the bottom setting - overlap them or move them up.
4) Never set the pizza stone directly on the plate setter. This will just transfer all of the heat to the pizza stone making it too hot to cook. It is critical that there is a kind of escape valve for this heat energy in the form of an air gap. This gap will allow the heat from the top of the plate setter to dissipate before reaching the pizza stone.
There are a number of stands and racks available. Any device that lifts the pizza stone off of the plate setter and increases the air gap can be beneficial. A double rack like the Pizza-Porta RCL rack, serves this purpose and also allows more capacity. Having two stones is great as you can do pizzas two at a time!
Pizza Stones
There is variability in pizza stones. The kamado manufacturers all provide a type of stone that is heavy duty enough for 700F + degree cooking. Some kitchen supply companies make pizza stones that are for home ovens and only stand up to 500F degree pizza cooking. The importance of the stone is to provide a surface that will retain enough heat to cook the bottom of the pizza. The porosity of the stone benefits the crust by drawing in moisture. Buy a stone that is heavy enough to withstand high temperatures and will provide a suitable surface for your cooking style. Thermarite is a more durable material than firebrick. Beware of pizza stones that are larger than the diameter of the platesetter/deflector (BGE XL stone) as they will block airflow and will receive energy directly from the fire without the benefit of deflection. One final consideration is the certifications on stoneware matter. Lead and other contaminants have been found in cheap ceramics.
Heat Retention in a Pizza Stone
Each raw pizza placed on the stone will bring the cooking surface down 30-40F degrees. In a wood-fired oven, the pizzaioli will spin a pizza in place to take advantage of this. The heat is all in the ceiling of a wood-fired oven so a pizza will shade the floor keeping it from scorching on the bottom. It is important to consider this when planning for a party. If the stone will be sitting empty in the grill 10-15 minutes between pizzas, the temperature will climb between each one. Be cautious when cooking the next pizza. If you are going to cook with long breaks, add extra deflection, use a slightly lower temperature, or cook a couple pizzas in succession to get the temp back down. If you are rolling pizzas out as fast as they come out, you will need a moment for the stone to heat back up occasionally.
Lighting
Lighting a kamado grill for pizza is not a trivial detail. There are differences between lighting for a 250F degree cook and a 600F+ cook. For pizza at 600F you need a big fire. Use an absolutely full load of fresh lump. Then, light the lump in a number of places so that the fire can spread to engulf more of the fuel. Allow the fire to get established as you are loading in all of the internal components. Leave the top dome open for a few minutes and let the fire get big. Make sure that all of your ceramics (plate setter, pizza stone and oven walls) soak in heat for 30 minutes before cooking your first pizza. A pizza will stick to a stone that is less than 400F.
Wood-Fire vs. Gas
A kamado grill is a fantastic device for using wood to cook pizza. Cooking pizza on a wood-fired oven is quite a luxury. It is the most authentic taste and only wood-fired pizza can be Vera Pizza Napoletana certified. At these high temperatures, the smoke of the charcoal is minimal, but the moisture content and touch of smoke make a profound difference to the character of a crust. Cooking on the patio with only the crackle of the fire, vs the blast of a propane jet is quite different. You have already chosen the best charcoal grill in the world, you know all the benefits of wood-fire over propane, use it to cook pizza.
Pizza-Porta
All of the above advice is generic to cooking pizza on any kamado grill. For those of you ready to take your Pizza to the next level, the Pizza-Porta is a game-changer. Trap the heat and focus it on the pizza, just like a wood-fired oven.
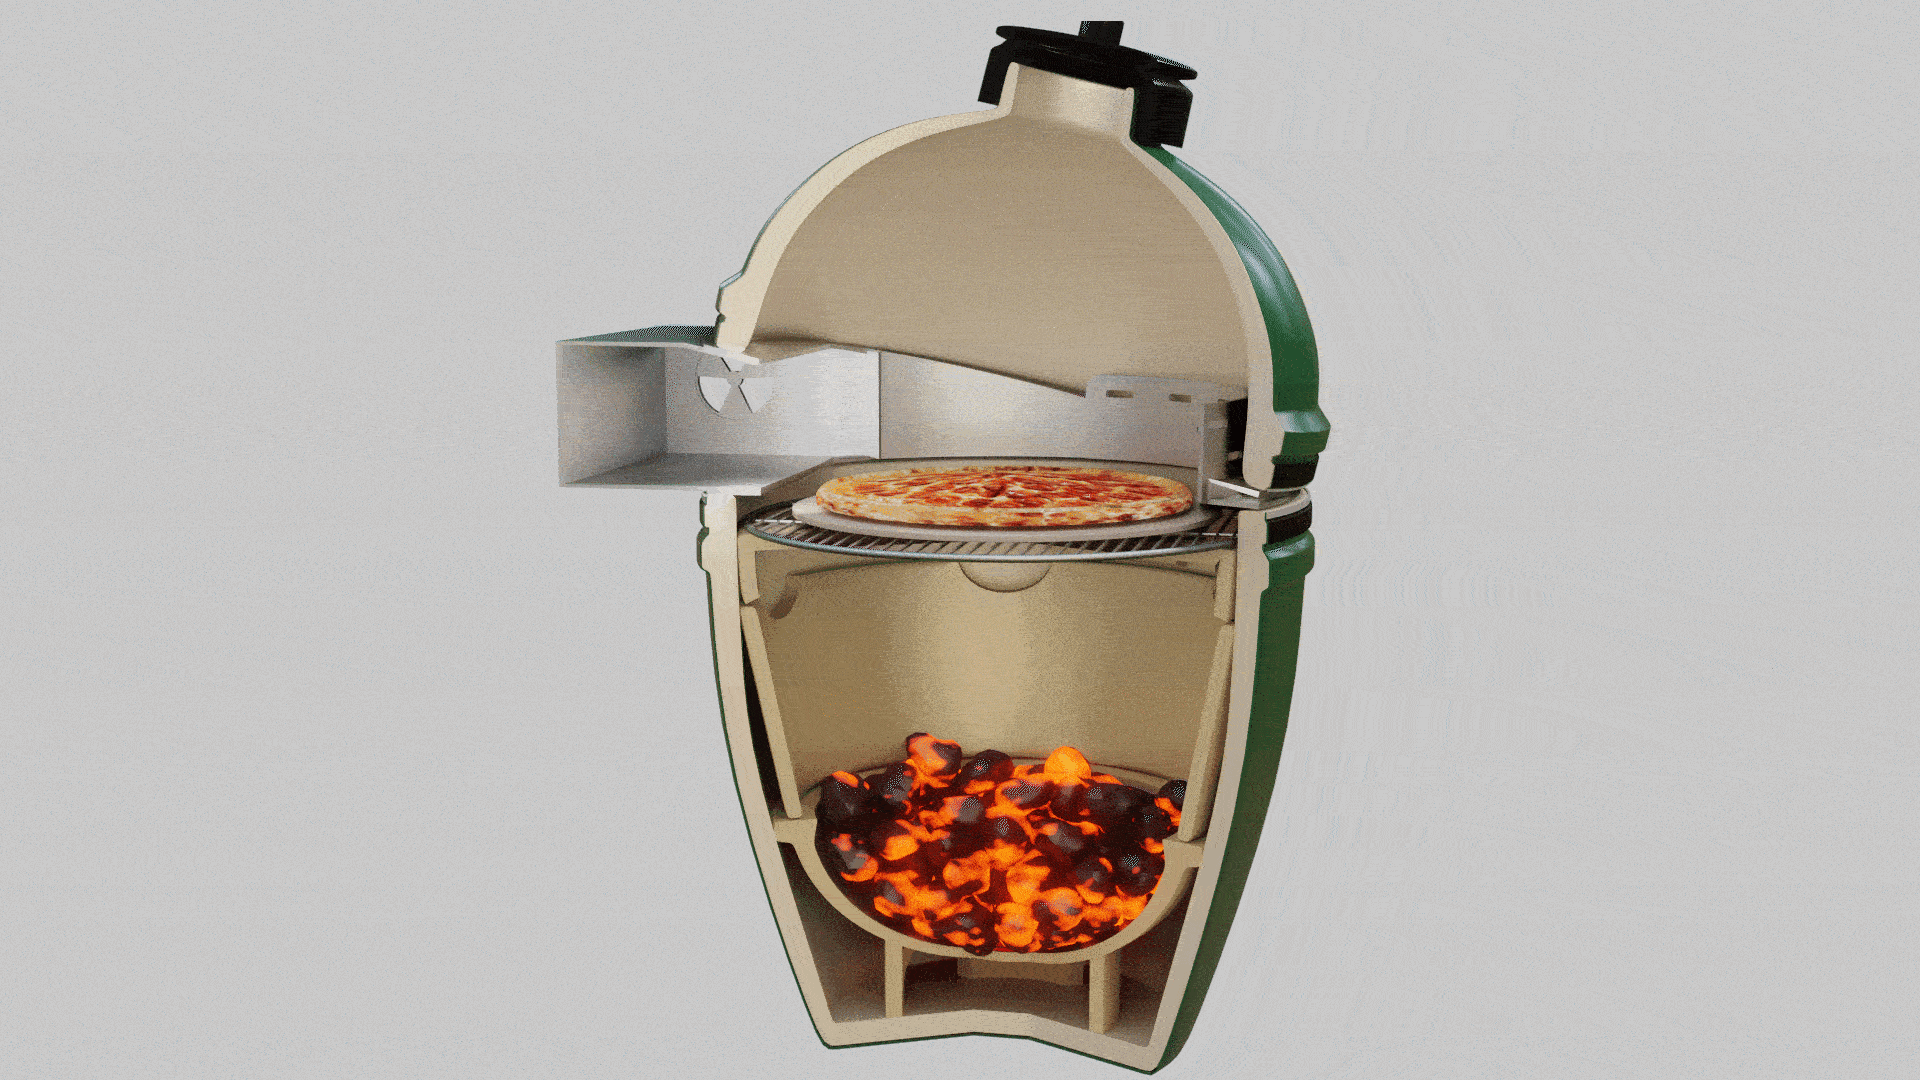
Here is how easy it is to get the Pizza-Porta rolling: Light the lump in a number of places around the edge. Next, place the racks and stones in your desired setup. Place the Pizza-Porta with side vents closed in the grill and close the dome. Leave the chimney vent and bottom vent open fully for maximum airflow while heating up. The temperature will rise slowly as the heat is getting soaked into the ceramic of the walls, deflectors, and stones. As the grill approaches 550F degrees, close off the top chimney vent and open the side Pizza-Porta vents. All of the energy is trapped, super-heating the dome. Your kamado grill is now operating as a true pizza oven! The curved dome is hot, focusing radiant energy on the top of your pizza, and the heat must travel across the pizza to escape like a convection oven. This heat intensity envelopes your pizza to cook it evenly and thoroughly.
Once the temperature is dialed in with the side vents it will be consistent for hours of cooking - even as you open and close the door. The door is designed to retain your desired temperature. You can stop losing all of your heat to check a pizza while maintaining temperature control. If the temperature creeps above your target, throttle down with the side vents and the bottom vent. Simple.
More on how the Pizza-Porta harnesses the grill HERE.
A couple of other links: